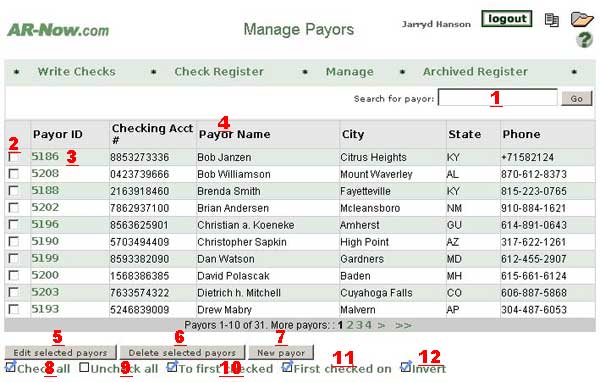
The Manage Payors register is the main working area for working with
existing
Payors. Whether it is editing existing payors, deleting Payors,
or even creating a new payor, you can do it here. AR Now online
which was created by Perusion
using Interchange,
uses an extremely efficient technique for the manipulation of multiple
records. You first select the records you wish to work with, then
proceed with the operation automatically. The selection procedure
is the same whether you are editing or deleting payors. This
allows for a quick learning curve for all operations. All
operations can be performed on individual or multiple Payors.
Below is a screen shot with specific operation areas labeled with
numbers. The corresponding explainations for each area are listed
below.

- Search for Payor
- You
can search for a string in the payor record to find specific payors.
There are three types of searches:
- Single letter. If you put a single letter in the
search box, it will find payors with that last name.
- Simple search. If you put a word (or number) in the
search box, it will find all occurrences of that word (or words) in
payors.
- Fields search. If you put in state=IL, it will find payors in
the state of Illinois. If you put phone=612, it will find phone numbers
containing 612.
- Select Boxes
- This left-most column containing
checkboxes is the heart of the multiple selection capability of the
Manage Payors register. To select Payors for edit or deletion, simply
put a check
into the
box next to the Payor that you want to edit. You can select as
many Payors as you like for all operations. There are some time saving
approaches to using the check
boxes, and these are explained in #s 8 - 12.
- Single Payor Edit
Link - If you simply want to edit
one Payor, just click on it's Payor ID. This is a link that will take
you to the Payor Edit page. We have a detailed explaination of the
Payor Edit Page here.
- Sort
By Headers - Each column header is a link. If you click on
this
link, the Register will be sorted by that column. If you click on it
again, the Register will be sorted by that column, only in reverse.
- Edit Selected Payors - Click this
button AFTER you have
selected Payors you want to edit (described in #2) and you will be
brought to the Payor
Edit
Page.
If you have selected more than one Payor, after you edit the
first Payor and press OK, the next Payor selected will appear in the
edit window automatically. This will continue until you have
edited all Payors selected.
- Delete Selected Payors - Click this
button AFTER
you have selected Payors that you want to delete (described in
#2). All Payors selected will be deleted. IMPORTANT- THIS
OPERATION IS NOT REVERSIBLE. DELETION IS PERMANENT. If you are not
sure, use Archive instead. You can always delete from there at a
later date.
- New Payor -
Click this button to add a new payor to your records. Click here
for
more information.
Items
8-12 are all Click Savers.
What this means simply is that you can use them instead of having to
select many items individually. Each Click
Saver is described below.
- Check
all. Clicking on this Click Saver will put a check mark in
front
of all of the Payors currently displayed in the register. Example: Want
to clear all the Payors in the register? 2 clicks will do it. Just
click this Check all button, then click on #6 Mark selected Payors
cleared. All of the displayed Payors will be marked as cleared.
- Uncheck all.
Yes it's obvious, does the opposite of #8, Check all.
- To
First Check. This one will place a check
mark into all of the boxes above the currently selected box.
Example, in the screenshot above, suppose you wanted to check all of
the records above Payor ID 15471. First, place a check mark into
the box next to Payor ID 15471. Next, click on the "To First Check"
Click Saver. Check marks will be placed in all Payors above 15471.
- First
Checked on. This is just the opposite of
To First Check. Clicking this will place check marks in all boxes
BELOW the currently selected box.Example, in the screenshot above,
suppose you wanted to check all of
the records above Payor ID 15471. First, place a check mark into
the
box next to Payor ID 15471. Next, click on the "First Checked on" Click
Saver. Check marks will be placed in all Payors below 15471.
- Invert..
This Click Saver will invert, or
reverse the currently selected boxes to not selected, and not selected
to selected. Example: Suppose you wanted to print all the Payors
in the above screen with the exception of Payor ID's 15475 and
15488. Simply put a check into each one of those boxes, then click on
the Invert Click Saver. All Payors with the exception of the 2 you
initially selected will now have check marks. Then click on #7
Print selected Payors, and you are good to go.
|

